使用场景
现在我们平常支付都是用微信或支付宝支付,但是微信支付的申请流程比较的复杂。所以支付宝沙箱非常适合开发者进行接入支付宝开发。支付宝沙箱可以提供给我们虚拟的支付环境和账号,让我们可以轻松的调用。
申请支付宝沙箱的流程
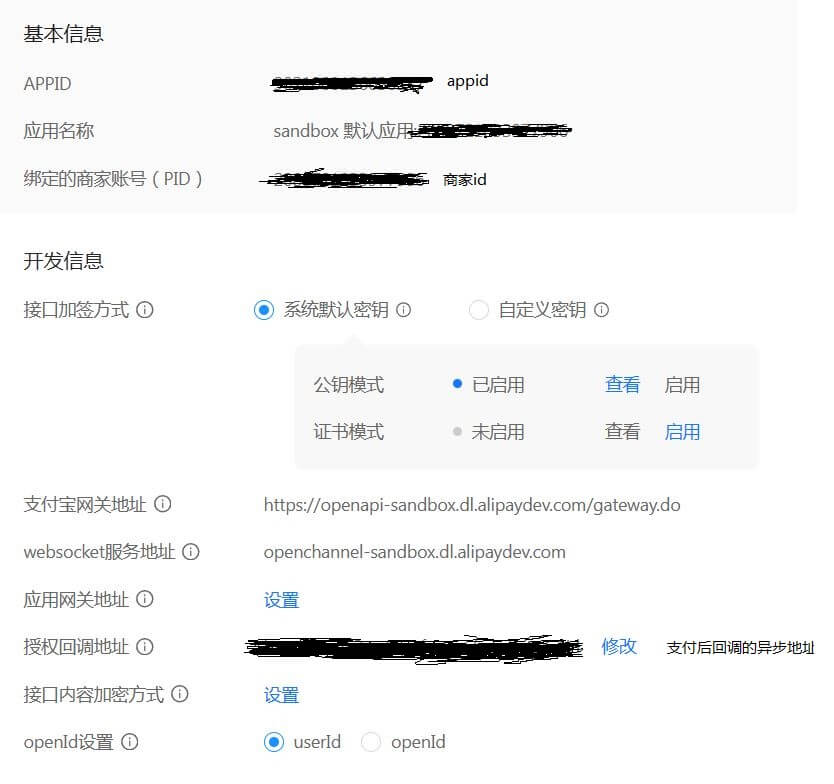
首先我们注册支付宝沙箱,然后我们开启支付宝沙箱。沙箱会给我们相应的 id 等信息。

可以看到上面有支付宝给我们的 appId 和应用名称 Id,以及绑定的商家号 Id,我们接口加签方式就不改为自定义密钥了,用系统默认的。这里还需要注意授权回调地址,这个是我们调用完支付接口后支付宝给我们异步的返回支付接口的地址。
编写代码
这里我编写是手机网站支付的接口,若要使用其他的可以看沙箱中的文档。
首先先引入 pom 依赖。
1
2
3
4
5
6
|
<dependency>
<groupId>com.alipay.sdk</groupId>
<artifactId>alipay-sdk-java</artifactId>
<version>4.34.0.ALL</version>
</dependency>
|
接着我们创建一个 Controller 类,里面定义一些基本的常量。
1
2
3
4
5
6
7
8
9
10
11
12
13
14
15
16
17
18
19
20
21
22
23
24
25
| @Controller
@RequestMapping("/pay")
public class PayController {
@Autowired
private OrderService orderService;
private final String APP_ID = "appid";
private final String APP_PRIVATE_KEY = "应用私钥";
private final String CHARSET = "UTF-8";
private final String ALIPAY_PUBLIC_KEY = "支付宝公钥";
private final String GATEWAY_URL = "https://openapi-sandbox.dl.alipaydev.com/gateway.do";
private final String FORMAT = "JSON";
private final String SIGN_TYPE = "RSA2";
private final String NOTIFY_URL = "异步回调";
private final String SELLER_ID = "商家Id";
}
|
应用私钥和支付宝公钥可以在沙箱控制台中看到,记住我们应用私钥需要选择 JAVA 语言。
接着写一个支付接口
1
2
3
4
5
6
7
8
9
10
11
12
13
14
15
16
17
18
19
20
21
22
23
24
25
26
27
28
29
30
31
32
33
34
35
36
37
38
39
40
41
42
43
44
45
46
47
48
49
50
51
52
53
54
55
56
57
58
59
60
61
62
|
@ResponseBody
@GetMapping("/alipay")
public String alipay(
@RequestParam String orderId,
@RequestParam String price,
@RequestParam String comment) throws AlipayApiException, IOException {
AlipayConfig alipayConfig = new AlipayConfig();
alipayConfig.setServerUrl(GATEWAY_URL);
alipayConfig.setAppId(APP_ID);
alipayConfig.setPrivateKey(APP_PRIVATE_KEY);
alipayConfig.setFormat(FORMAT);
alipayConfig.setAlipayPublicKey(ALIPAY_PUBLIC_KEY);
alipayConfig.setCharset("UTF-8");
alipayConfig.setSignType(SIGN_TYPE);
AlipayClient alipayClient = new DefaultAlipayClient(alipayConfig);
AlipayTradeWapPayRequest request = new AlipayTradeWapPayRequest();
AlipayTradeWapPayModel model = new AlipayTradeWapPayModel();
model.setOutTradeNo(orderId);
model.setTotalAmount(price);
model.setSubject("描述");
model.setProductCode("QUICK_WAP_WAY");
model.setSellerId(SELLER_ID);
String body = comment;
model.setBody(body);
request.setBizModel(model);
request.setNotifyUrl(NOTIFY_URL);
AlipayTradeWapPayResponse response = alipayClient.pageExecute(request, "POST");
String pageRedirectionData = response.getBody();
String htmlContent = "<!DOCTYPE html>" +
"<html lang=\"en\">" +
"<head>" +
"<meta charset=\"UTF-8\">" +
"<meta name=\"viewport\" content=\"width=device-width, initial-scale=1.0\">" +
"<title>Alipay Form</title>" +
"</head>" +
"<body>" +
pageRedirectionData +
"</body>" +
"</html>";
String tempFileName = orderId+"_alipay_form.html";
String staticPath = "src/main/resources/static/image/pay";
File targetFile = new File(staticPath, tempFileName);
try (FileWriter writer = new FileWriter(targetFile)) {
writer.write(htmlContent);
}
return "/static/image/pay/"+tempFileName;
}
|
写完支付接口后,然后我们需要写一个回调的接口,但是呢这个回调必须要我们有一个公网的 IP。所以我们需要用到内网穿透,这里我自己用的是 natapp,大家可以自己去看上面有免费的隧道,具体使用方法就不细讲了。我们开启了内网穿透后,开始编写回调接口。
1
2
3
4
5
6
7
8
9
10
11
12
13
14
15
16
17
18
19
20
21
22
23
24
25
26
27
28
29
30
31
32
33
34
35
36
37
38
39
40
41
42
43
44
45
46
|
@ResponseBody
@PostMapping("/returnUrl")
public ResultBase returnUrlMethod(HttpServletRequest request) throws AlipayApiException, IOException {
Map<String, String> params = new HashMap<String, String>();
Map requestParams = request.getParameterMap();
for (Iterator iter = requestParams.keySet().iterator(); iter.hasNext(); ) {
String name = (String) iter.next();
String[] values = (String[]) requestParams.get(name);
String valueStr = "";
for (int i = 0; i < values.length; i++) {
valueStr = (i == values.length - 1) ? valueStr + values[i]
: valueStr + values[i] + ",";
}
params.put(name, valueStr);
}
boolean flag = AlipaySignature.rsaCheckV1(params, ALIPAY_PUBLIC_KEY, "UTF-8", SIGN_TYPE);
if (flag) {
if (params.get("trade_status").equals("TRADE_SUCCESS")) {
String orderId = params.get("out_trade_no");
String comment = params.get("body");
int i = orderService.changeOrderState("待制作", orderId);
int i1 = orderService.setComment(comment, orderId);
String tempFileName = orderId+"_alipay_form.html";
BaseUtil.DeletePayHtml(tempFileName);
}
System.out.print("success");
} else {
System.out.print("fail");
}
return ResultBase.success("");
}
|
其实主要是来自支付宝上的文档只不过加入了一些自己的判断,在支付成功时进行一些数据库的操作等。
前端调用接口
然后前端进行调用接口,然后用 WebView 进行解析后端的支付宝支付的 html。然后就是输入账号密码(这里用的是沙箱给我们的虚拟用户号,具体可以在沙箱的沙箱账号中查看)
调用支付的接口
1
2
3
4
5
6
7
8
9
10
11
12
13
14
| const orderId = option.orderId;
const common = option.common;
const price = option.price;
this.$api({
url: `/pay/alipay?orderId=${orderId}&price=${price}&comment=${common}`,
method: "GET",
}).then(
(response) => {
this.form = response.data;
},
(error) => {
console.log(error.message);
}
);
|

